
Security
If you are running the application on a remote server, you should secure the server so that no one except you has access to it. Because Jesse is a self-hosted application, it is not supposed to be accessible by the public. That makes it much easier to secure the application.
I will mention two methods here, but security is a big topic. Nonetheless, I think these two methods are enough.
1. Password
Change the password (PASSWORD) in your .env file. Make sure to set it to something secure. You can use a password generator service to generate a strong password.
2. Limit access to your IP address via the firewall
Jesse itself is built with security in mind, and since launch there have been no reported hackings whatsoever. That said, setting up a firewall — and especially restricting access to your own IP address — essentially removes any chance an attacker might ever have. It's a simple step that makes your server practically invisible to the outside world.
The dashboard is supposed to be accessible only by you. That makes it easy to secure. The best approach is to close all incoming ports except for the ones you need, and even for those, limit access to your own trusted IP addresses only.
This can be done via both a firewall from within the server or the firewall that your cloud provider provides (Hetzner, DigitalOcean, etc).
UFW Firewall
If you are NOT using the Docker setup, you can use ufw which is a popular firewall that ships with Ubuntu:
# to see if ufw is installed and activated
ufw status
# if it's active, stop it:
systemctl stop ufw
# allow all outgoing traffic
ufw default allow outgoing
# deny all incoming traffic
ufw default deny incoming
# allow ssh port (22)
ufw allow ssh
# Jesse uses two ports: 9001 for the dashboard and 9000 for the LSP server (code editor).
# It's best to allow specific IP addresses only.
# Assuming your IP addresses are 1.1.1.1, 1.1.1.2, and 1.1.1.3, run:
ufw allow from 1.1.1.1 to any port 9001 proto tcp
ufw allow from 1.1.1.2 to any port 9001 proto tcp
ufw allow from 1.1.1.3 to any port 9001 proto tcp
ufw allow from 1.1.1.1 to any port 9000 proto tcp
ufw allow from 1.1.1.2 to any port 9000 proto tcp
ufw allow from 1.1.1.3 to any port 9000 proto tcp
# enable the firewall
ufw enable
# check the status
ufw status numbered
# restart ufw to apply the changes
systemctl restart ufw
Data center Firewall
UFW doesn't play nice with docker. Here is how to use Hetzner's firewall service which is free to use. Other data centers usually have similar firewall services.
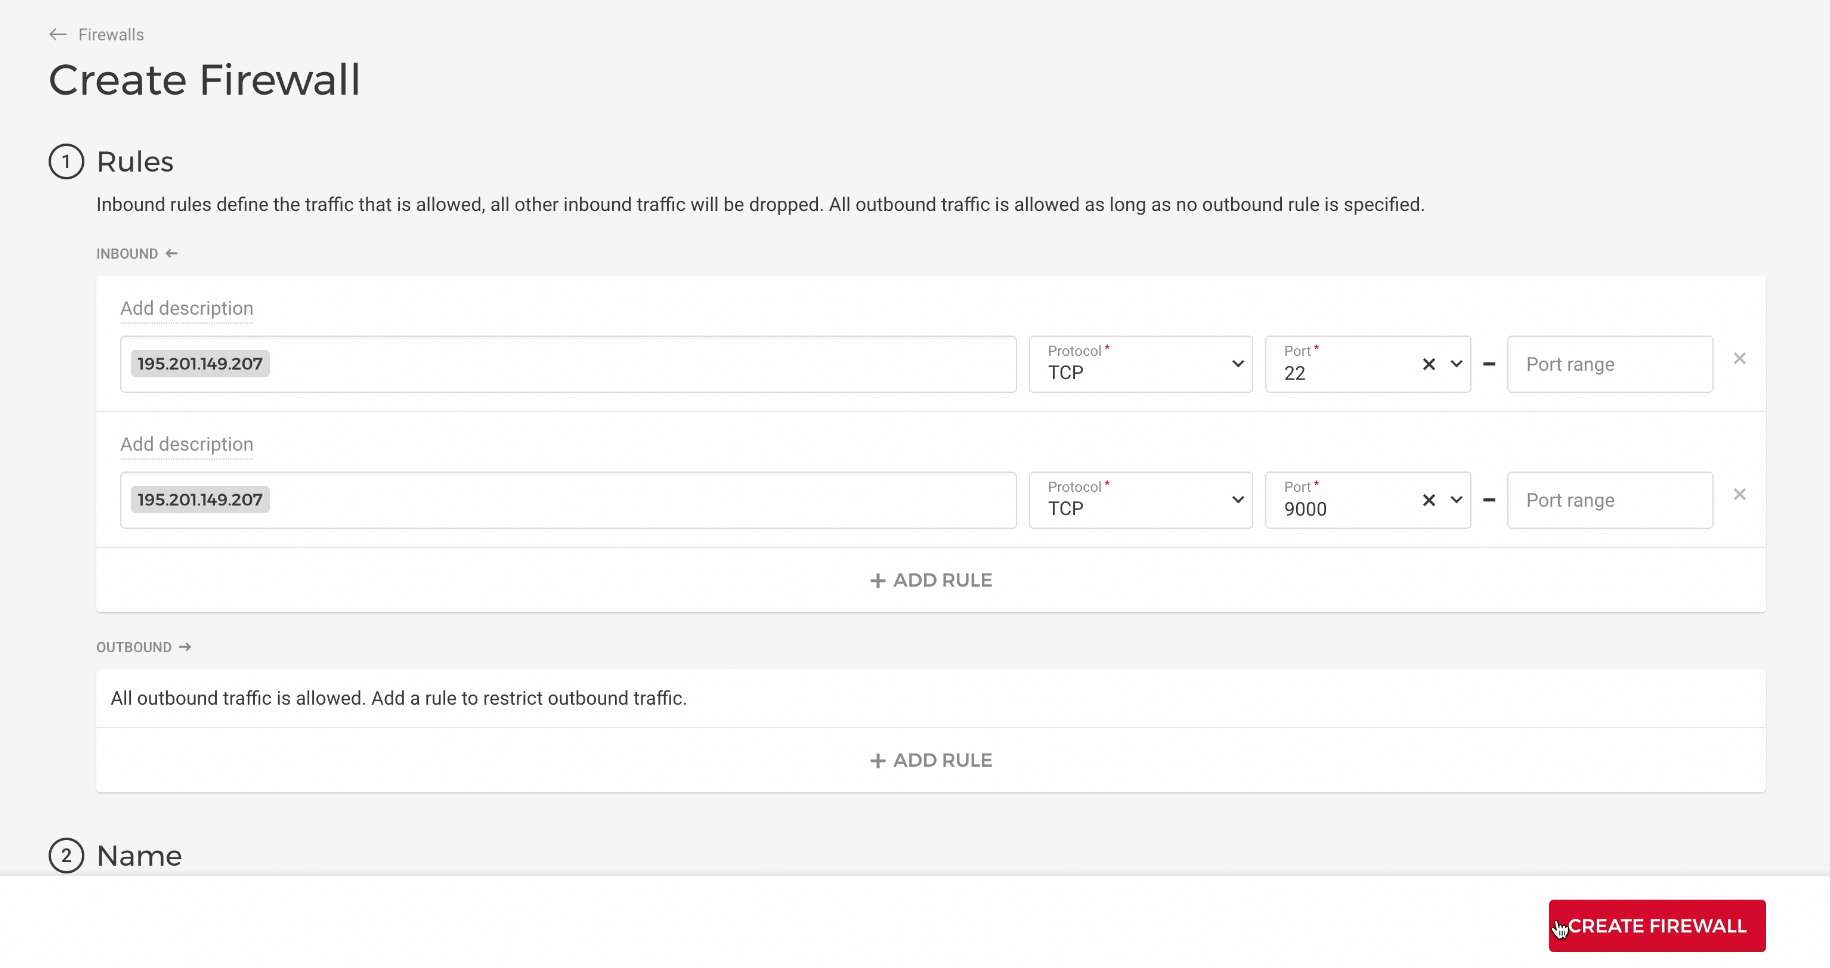
Go into your server's page and click on the "Firewalls" tab and click on the "CREATE FIREWALL" button:

First, find your local machine's IP address by using a website such as this one.
Now remove the default values saying "Any IPv4" and "Any IPv6" by clicking on them and hitting the backspace button of your keyboard. Then, paste in your local machine's IP address.
We need three rules like this. Set the Protocol to TCP for all of them. One should be port 22 (SSH, so you can still SSH into your server), one should be port 9001 (the Jesse dashboard), and one should be port 9000 (the LSP server that powers the code editor).
In the end, click on the "CREATE FIREWALL" button.
If you changed your IP address in the future, you can always update the firewall rules and add your new IP address. That is a good reason why using Hetzner's firewall is better than using a firewall from within the server.
DigitalOcean Firewall
After your droplet is created, go to the Networking section in the DigitalOcean sidebar, scroll down, and click on Manage Cloud Firewalls. Then click the Create Firewall button.
You need to open three things: SSH access and the two ports Jesse uses.
| Purpose | Port(s) | Recommended Source |
|---|---|---|
| SSH | 22 | Your IP address only |
| Jesse dashboard | 9001 | Your IP address only |
| Jesse LSP server (code editor) | 9000 | Your IP address only |
Security recommendation
Restricting all three ports to your own IP address is the strongest security posture. If you can't do that for all ports, at minimum restrict SSH (port 22) to your IP.
To add a rule for ports 9000 and 9001, click Add another under the inbound rules section. Set the Type to Custom, the Protocol to TCP, and enter the port range as 9000-9001. In the Sources field, remove the default "All IPv4 / All IPv6" entries and type in your own IP address instead.

Do the same for port 22 (SSH), also restricted to your IP.
No static IP?
If your ISP assigns you a dynamic IP address, consider setting up a lightweight VPN such as Outline on your droplet. This gives you a stable, private IP to whitelist in the firewall. Whenever you need access, connect to your VPN first. And whenever your IP changes, you can simply update it in the DigitalOcean firewall settings.
Scroll down to the Apply to Droplets section, select the droplet you just created, give your firewall a name (e.g., Jesse-firewall), and click Create Firewall.